Project E46 M3 - Replacing Front Wheel Bearings January 19 2014
We have a friend that had a bad wheel bearing, but kept driving on it for a while. Finally, the bearing seized up and the wheel locked up while the car was at speed. There was lots of tire smoke and plenty of steering correction, and a soiled pair of underwear later, the car came to a stop in the middle of the busy road. Luckily, no one was hurt, and no damage was incurred, but it could have been bad.
When our E46 M3 had started to make a whirring sound at certain speeds, we suspected a bad wheel bearing and wanted nothing to do with a seized wheel bearing. We had recently tackled this same job on our E36 M3, and the process is very very similar. Basically, you strip off all the brake components, pull off the wheel bearing, and then put new parts back in. With the right tools, it's not a difficult job, so let's get started.
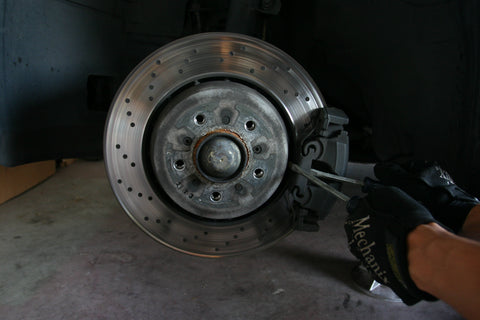
Our particular E46 M3 is equipped with the factory competition package, so the brakes are a little more giant than most. All E46 brakes are very similar. Heck, all BMW brakes are pretty similar. Begin by getting the car safely up in the air and taking the wheel off. The first step to taking the brake caliper off is to remove the rattle clip. Pry the rattle clip aft with one screwdriver, while the other screwdriver pops it outboard as shown in the photo.

There are only two screws that hold the brake caliper on. Easy, right? Pry off the dust covers with a screwdriver and then get a 7mm allen wrench or allen socket on the bolts. The caliper is now almost free. We told you it was easy, right?

We noticed something strange with the factory cross drilled rotors. The holes were clogged with brake dust. The holes are typically countersunk when the rotors are new, which reduce the stress concentrations, and help to evacuate dust. Once the rotor wears down enough to remove the countersink, the sharp edges of the holes eat through the pads quickly and the holes clog with brake material. This side's brake pads and rotors were worn down a lot more than the other side. We didn't notice any impact on braking performance or a pull to one side while braking. Nonetheless, its time for some new rotors and pads, but we'll deal with that later.

Let's get back to what we had set out to do. To remove the caliper, I pulled outboard on it for a good 20 seconds to send the caliper piston ever so slowly back into the caliper. Then I wiggled it off of the rotor and hung it out of the way with a rope. If you let the caliper hang by the brake line, you can damage your brake line.

Next, we are going to loosen, but not remove the two screws that hold the brake rotor onto the hub. Stick a screwdriver in a cooling vane and brace it against the brake caliper mounting bracket to keep the rotor from spinning. Take an allen wrench or allen socket and loosen the screw. Our screws wouldn't loosen easily, so we had to thump on the allen key with a mallet to get it to release.

Now we remove the brake caliper mounting bracket. It is held on by two bolts.

Now with the brake caliper mounting bracket removed, we can fully remove the two screws that hold the rotor onto the hub. Once the screws are off, the rotor can come off. Sometimes the rotor can get rusted to the hub and won't come off easily. In that case, give it some good, hard whacks with a rubber mallet. We've had a rotor stuck so badly that we had to take a sledge hammer to it, but this can damage your rotors, so reserve this as a last resort if you're not replacing your rotors at this time.

We're almost there. Remove the dust cap from the hub. I used a screwdriver and a mallet to deform an edge of the cap and then pried around the perimeter once there was a gap to get a screwdriver in. Sometimes this requires a lot of pounding before it comes out.
Now is also a good time to remove the wheel speed sensor. There is just a bolt holding it on. It is hard to get a camera in to take a photo of it, but follow the wire and you'll find it. The only other wire is the one that goes to the brake pad wear sensor.

Now the nut that holds the bearing on is revealed. It has a tab folded into the gap on the spindle. This keeps the nut from backing out and causing your wheel to leave the rest of the vehicle. Knock this tab back with a screwdriver and a mallet.

We now take off the wheel bearing nut. It requires a 46 mm socket. The socket we bought had too thick of a wall thickness and the socket wouldn't fit inside the hub, so we had to grind down the outside of the socket with an angle grinder to allow it to fit. The nut is torqued to 290 N-m (214 ft-lb), so a long breaker bar is almost a necessity. Chuck Norris, if you are performing this, a breaker bar will be unnecessary.

We used a standard three-jaw bearing puller to pull the hub off. We stuffed a socket or two in the center of the spindle to give the bearing puller something to push against.

The bearings on both sides came off cleanly this time, but sometimes the inner race will stay stuck on the spindle.

This is a photo from our E36 M3 where the inner race of the bearing stuck to the spindle. You can buy a fancy gear puller that clamps down on the part. We pushed some baling wire through the holes in the jaws and twisted them tight to close the jaws hard. While twisting tightly with a pair of pliers, we worked the bearing puller and the jaws didn't slip off the race. Another technique is to cut a groove in the race in an inboard/outboard direction with a Dremel tool and then hit the groove with a chisel to crack the race. The race should then come off easily.

Here is the shiny new bearing waiting to go in.

The new bearing presses onto the spindle. Apply a thin layer of high pressure grease onto the spindle to ease installation. Tap in the new bearing, but only apply force to the inner race of the bearing (the part that has text on it). Applying force to the outer portion of the bearing can cause the inner and outer race to separate. I placed a 36 mm socket against the inner race and tapped it into place. You can get creative with a segment of pipe or the inner race from the old bearing. You only need to get it on far enough for the wheel bearing nut to get started. The wheel bearing nut will push the bearing on the rest of the way.

Torque the wheel bearing nut to 290 N-m (214 ft-lb) and then create that locking notch. I used a chisel to make two cuts to form a tab which I then bent into the notch in the spindle. A screwdriver has a harder time cutting notches, but it can work in a pinch.

Since the rotor had some light rust on it where it mounted to the hub, we cleaned up the rust with a Scotchbrite pad and applied a thin layer of anti-seize compound to the mating surface. Your future self will thank you.

Install the dust cap (blue) by centering it up on the hub and then tapping the center of the cap to push it onto the hub. Install the wheel speed sensor. Mount the rotor, caliper and brake pads. Re-install the spring clip. Wipe down the surface of the brake rotor with brake cleaner or rubbing alcohol if you got any grease or oil on it. Put the wheel back on and lower the car back down. You're done!
Now you can drive down the highway knowing that your wheels won't seize up. By doing this yourself, you've saved quite a bit of money, but more importantly, you've learned a little about your car and you know that the job was done right. Anytime we finish a job, we love the sense of satisfaction that comes with completing it.
Other Articles:

Nine Habits on the Street for Better Lap Times
