Project E46 M3 - Front Pads and Rotors January 27 2014
Our BMW E46 M3 is fitted with the competition package, which includes brakes that will rip your face off if you get on the pedal too hard. The calipers are the same as the standard E46 M3's, but the rotor has grown substantially from 12.8 to 13.7 inches in diameter. We were getting a weird wear pattern on the front left rotor, so it was time to change the rotors and pads. It is recommended to change both sides at the same time. We'll take you through what it takes to replace the rotors and pads. It is not too difficult, and it took us about 40 minutes per side at a leisurely pace. So let's get started.
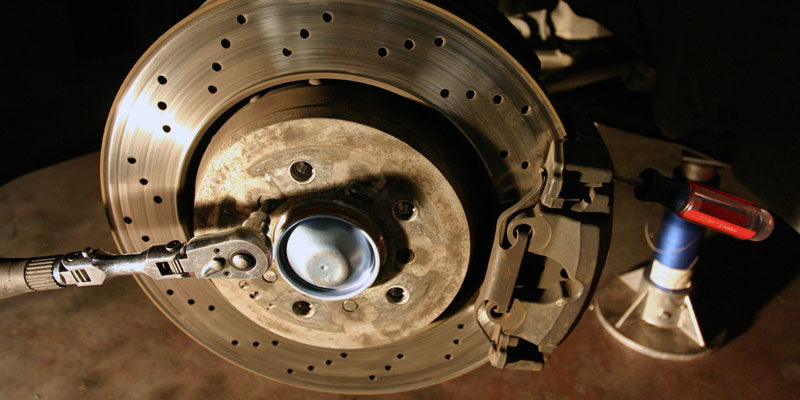
Begin by getting the corner of the car safely in the air and taking the wheel off of the car. Loosen, but don't remove the two screws holding the rotor to the hub. Stick a screwdriver in the rotor vanes and brace it against the caliper to keep the rotor from spinning while you do this.

Remove the anti-rattle clip by prying aft on it with one screwdriver, and then use a second screwdriver to pull the clip outboard and out of the holes it mounts in.

Remove the dust caps from the caliper slide pins by prying them off with a screwdriver. There is an upper one and a lower one. The upper one is shown.

Use an allen wrench or allen socket to remove the two caliper slide pins. Once the pins are out, you can remove the caliper. The caliper will likely be still grabbing onto the rotor, and it will be difficult to get it off. grab the caliper and pull it outboard against the rotor for a good 20 seconds. The caliper piston will get pushed back in ever so slowly. If it doesn't release, keep pulling on the caliper for 20 seconds at a time until it backs out enough. A word of caution: if the car is on jack stands, push on the rotor while pulling on the caliper. This will prevent you from pulling the car off the jack stands.

Once the caliper is free, hang it using a wire or rope so that it isn't just hanging by the brake line. The brake line wasn't meant to support the weight of the caliper. We like rope because it can't scratch paint and it is reusable.

Remember the two screws holding on the rotor that we loosened at the beginning? Take those off and take off the old rotor. If the old rotor has a hard time coming off, bang on the rotor with a mallet to loosen it up. Our new rotor is ready to go in.

Tip: If you apply a thin layer of anti-seize compound to the hub, there will be less chance of the rotor rusting onto the hub, and will make future removal easier. Put the new rotor on, and secure it with the two mounting screws. Torque these to 12 ft-lbs. The rotors are different for each side, so make sure you don't mix them up.

Now to put the new pads on, the caliper piston will have to be pressed back in, since the new pads will be thicker than the old pads. We used a disc brake caliper spreader to do this. Note how we used an old brake pad to protect the new brake pad from getting marred by the tool. If you don't have one of these tools, you can use a C-clamp or some channel locks to squeeze the piston back into the caliper. Just be sure to use something like a rag to protect the caliper and piston.

I find it easiest to install the inboard pad onto the caliper and the outboard pad onto the rotor (shown), and then slide the caliper onto the rotor. Make sure the brake pads fully seat into the caliper.

With the caliper on, grease the caliper slide pins and re-install them at 22 ft-lbs. Then re-install the anti-rattle clip by pushing aft on it, and then pushing the arms into the mounting holes. Put the wheel back on and you're done with one side. It's not too difficult of a job, and you'll save yourself a trip to the shop. After you have completed the other side, remember to celebrate with tacos and beer.
The rear brakes are very similar, but we will cover that in a future article. The main difference at the rear is that you have to fiddle with the parking brake adjustment when you put everything back together.
Other articles:

9 Habits for the Street that Will Make You Faster at the Track

12 Reasons Why Manual Transmissions Rock
