Rebuilding a BMW E36 Power Steering Pump August 28 2019
I was replacing all the power steering lines in our E36 M3 as a preventative measure, so I figured I should replace the seals in the power steering pump as well. I bought a genuine BMW seal kit for the power steering pump, but wasn't able to find any instruction on how to replace the seals. How hard could it be?

This is the 32 41 1 135 880 kit with all the seals laid out.

This is the power steering pump. Undo the 3 bolts holding the pulley onto the pump.

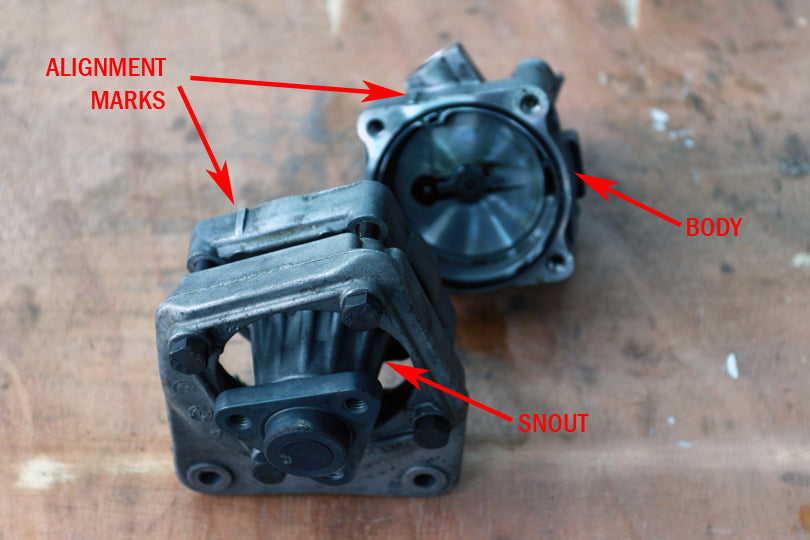
Undo the 4 bolts that hold the two halves of the pump together. We're going to call one half the snout and the other half the body. I have no idea if this is the official nomenclature, but that's what we're going to go with. Note the alignment marks when putting the unit back together. It is possible to reassemble the two halves in the wrong orientation. The orientation of the mounting bracket matters too, so take note of the orientation during reassembly.

This is how the inside of the pump looks like.

Already, we can see we have access to some of the seals. On the back of the snout, I picked out the tie-fighter-shaped seal with a bamboo skewer. I don't like using anything metal to pick at the seal, as it can end up scratching the sealing surface, but I've also seen many professional mechanics use metal picks.

Moving over to the body of the pump, there is an easily removable o-ring. So far, it's pretty easy and straightforward.

Shifting our focus back to the snout, we pry off the tie-fighter with a nylon trim-removal tool. Again, using metal here is a risky proposition. If you're going to insist on using a screwdriver to pry, at least wrap the screwdriver tip with tape or put a rag around the tip.

This is how the snout looks like with the tie-fighter removed.

The oval ring comes off by prying up on it just like we did with the tie-fighter.

The snap ring holding the rotor onto the shaft is quite difficult to get off. I had to hold the snout in a vise, stick a small screwdriver in the snap ring gap, then pry underneath with another screwdriver, and then work the rest of the snap ring off with a third screwdriver. Note the rubber band holding the vanes in the rotor. This ended up not being that useful because the vanes just ended up going everywhere anyways. Just remove them and set them aside until reassembly.

With the snap ring removed, the rotor comes off the shaft with some gentle prying. Note how the vanes are already trying to get away even with the rubberband.

We now flip the snout over and pry out the seal. The nylon trim removal tool was not strong enough for this job, so I had to use a pry bar. You have to be very careful not to scratch the inside of the snout. My prybar never touched the inside of the snout. We are now in a fully disassembled state, and now just need to put everything back together in the reverse order of how we took it apart, meanwhile replacing the old seals with new seals as we go.

I used a rubber mallet to tap the new snout seal in place. A little power steering fluid helps to lubricate the installation.

We now turn the snout over and put the rotor back on the shaft. Getting the snap ring back on is easier than getting it off, but still difficult. I pushed one end of the snap ring into the groove and held it there while working around the circumference to jam the rest of the snap ring into the groove. There is a high probability the snap ring will go flying across your work area and hide from you. One way to prevent this is to put the assembly inside a clear plastic bag while you work on it. The bag will contain the snap ring if it goes flying.

Reinstall the oval ring, the tie-fighter and then the tie-fighter seals. The seal can be accidentally installed upside down if you're not careful. Pay attention to installing the seals in the correct orientation as shown above. Don't forget about the metal tie-fighter seal too.
The rest of the reassembly is pretty straightforward. Putting it back together is the reverse of taking it apart. Your pump is now good for another couple of decades or couple of 100,000 miles. It ended up not being too difficult, except for the snap-ring, right?
