Project E36 M3 - Removing Kick Panels November 17 2017
We had to remove the front kick panel on our BMW E36 M3 while developing our aluminum dead pedals. This panel is the plastic one on the outboard side of the footwell that you will need to remove to access the speakers. These are also referred to as lateral trim panels in some parts catalogs. We couldn't find anything in the Robert Bentley shop manual, nor could we find much online beyond a few verbal descriptions. We took it upon ourselves to show you how they are removed.

Before we begin, I'd like to drop a shameless plug and suggest that if you're removing your kick panel, it would be a great time to install our dead pedal at the same time. They slip right on without any drilling and if you're already removing your kick panel, the installation is so easy. Our dead pedals don't require any drilling and improve on the looks of the OEM dead pedal while providing a grippier surface for hard cornering. So let's get started removing the kick panel.
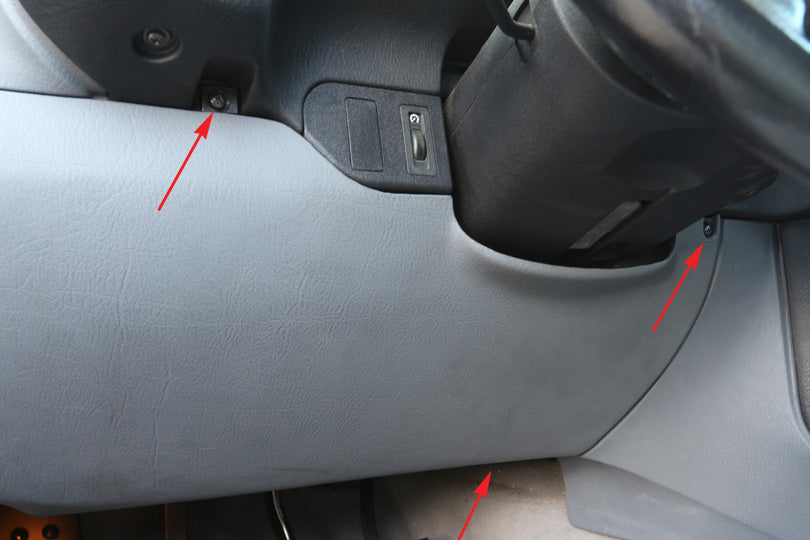
Start by removing the knee bolster. There are three phillips-head screws and a clip holding it on. These are the 3 screw locations. We'll show you the clip location next.

There is a small plastic clip that hooks into a hole in the dash. Pull rearward on the knee bolster to free the clip. With the clip free, now you can let the knee bolster drop so that we can unhook the electrical connections.

Undo the 3 electrical connectors. The black one on the left simply pulls out, but pull on the connector and not on the wires! The two connectors on the right have tabs to squeeze before they can be pulled out. With the electrical connections out of the way, the knee bolster has one last connection to the kick panel with a clip. It can now be removed by pulling rearward on the knee bolster.

Next, remove the screw holding the hood cable release lever, and then remove the lever itself.

Give this plug a quarter-turn to release it, and then coax it out of its hole.

The kick panel is ready to be removed, but this is a bit tricky. To show you what you're up against, this is the view of the back side of the panel. There are two clips and a tab that you are left to contend with. You will need to move the panel rearwards so that the clips are released before pulling the panel inboard to remove it. The side sill panel directly aft of the kick panel will fight you the whole time. I had success by prying up slightly on the side sill panel to give enough room for the kick panel to slide under it and aft. Use caution, as prying too forcefully can cause the clips can leave the rails on the side sill panel, and there is no easy way to pop them back in without removing the entire side sill panel.

It may help to wedge a non-marring pry stick under the side sill panel as shown above. But be careful not to pry too hard. The white, nylon clips are held by slots in the side sill panel. If you pry on the side sill trim too hard, the clip will pop out of the slots and it will be difficult to get it back in.

Above is a photo of the underside of the side sill panel. There are a bunch of nylon clips that fit into holes in the chassis. If you pull up too hard on the side sill panel, the white nylon clip will stay in the hole in the chassis, and pull out of the slot in the side sill panel. If you were planning on replacing your side sill panel, now would be a great time to do so, as it would make your kick panel removal easier. Here's a link to the DIY for the side sill panel removal and replacement.
So once you have the kick panel out, putting it back in is the reverse of installation. Take your time and don't break anything.
Related Articles:

Project E36 M3 - Side Sill Panel Removal
