Project E36 M3 - Removing the Valve Springs and Valve Stem Seals September 27 2023
While the cylinder head of our S52 was off for a head gasket replacement, it made sense to refresh the cylinder head and valvetrain. To disassemble the valvetrain, you need to compress the valve springs first to begin removing components. We could not find a valve spring compressor tool that we knew for certain would fit our S52, so we designed a custom tool to compress the valve springs. This tool will also fit M50, M52 and S50 engines. Here is a link to where you can purchase the tool from us: valve spring compressor tool.

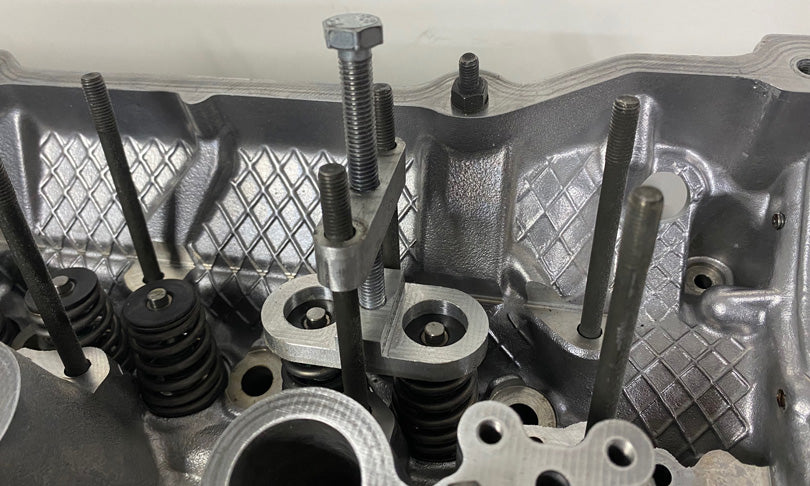
This is how the valve spring compressor tool looks like. The machined piece on the left will be referred to as the lower tool, and the machined piece on the right with the bolt going through it will be referred to as the upper tool.

The lower tool is placed on the top of the valves and the upper tool pushes down on the lower tool to compress the valve springs.

Nuts are threaded down over the upper tool to lock it in place.

The center bolt is then tightened down to push the lower tool down and compress the valve springs. The tool should compress smoothly without needing much more than 5 foot pounds of torque. If you meet any resistance along the way, something may be binding in the valve train. Once the tool bottoms out, don't continue to torque the center bolt.
If the valves start to move too, push up on the valves from the underside to keep them closed. If the head is still on the car, you may need to pressurize the cylinder with compressed air through the spark plug hole to keep the valves closed. We have also heard of a method of feeding rope down the spark plug hole at bottom dead center and then turning the engine by hand until the cylinder compresses the rope against the valves. However, we have never tried this method. Also, don't drop the entire rope down the spark plug hole, or it will be difficult to retrieve. Leave some rope to pull on for when it is time to remove the rope.

With the spring compressed, use a magnetic pickup tool or needle nose pliers to remove the valve stem keepers. We much prefer the magnetic pickup tool, as these tiny parts are difficult to pick up and easy to drop with pliers.

With the valve stem keepers removed, you can undo the center bolt of the tool and uncompress the valve springs. With the valve stem keepers no longer installed, the whole valve assembly comes apart.

Above is how the valvetrain looks like with the springs, retainers and valve stem keepers removed. Each valve is matched to each valve seat, because the parts wear into each other. Therefore, keep track of where each valve came from and don't mix up their locations. The exception to this is if you are having the valves and valve seats cut by a machine shop, in which case, the mating surfaces should all be the same after cutting.
We removed our valve stem seals by simply grabbing them with pliers and wiggling them off. Be very careful not to scratch the valve stems, as this is a sealing surface that will leak if it has any scratches. If the cylinder head is off the block, we highly recommend removing the valves before removing the valve stem seals.
We lubricated the new valve stem seals in engine oil and then used a deep socket and a mallet to gently tap them into place. You want pick a socket that will press mostly on the brass part, and as little as possible on the rubber part.
We had the machine shop hot-tank our cylinder head to clean out the carbon in the exhaust ports.

We also ultrasonic cleaned our valves while we were at it. About thirty minutes of ultrasonic cleaning did the trick. A cleaned valve is shown on the left and an uncleaned valve is on the right. Here is a link to the exact 3 liter ultrasonic cleaner that we used: Ultrasonic cleaner.*
Upon reinstallation, we lapped the valves into the valve seats manually with grinding compound. The process of lapping grinds the mating surface where the valve meets the valve seat so that the parts mate more perfectly and create a better seal. You can find the exact product we used through this link: Permatex valve grinding compound.*
We also used a valve lapping tool to perform the valve lapping. We didn't love the tool, but it was inexpensive and got the job done. We would have liked better suction, but with enough continuous downward pressure, we were able to make it work. Here is a link to the exact tool set we used: valve lapping tool.*

Reinstallation of the valve stem keepers requires some very skinny needle nose pliers or tweezers. Make sure the skinny end of the valve stem retainer is on the bottom.
You are now equipped with the knowledge to service your valvetrain. Working with the cylinder head on a bench, this isn't too difficult of a job, though it can get a bit tedious with 12 pairs of valves.
*As an Amazon associate, we earn from qualifying purchases. Purchasing through the link supports us and helps us to continue creating helpful content to the automotive enthusiast community.
